Here you would see information about Cyanotypes and the different way of toning them. You would, but it's incomplete at the moment.
Cyanotype and Toning
I. Introduction
d. Give an overview of the process and its history
e. You should bring in information from primary sources and from the reading
f. Include images
II. Links to relevant web pages, articles and videos
a. Contemporary artists using this method, alternative photo
III. Describe the process, recipes and materials
a. You should reference internet sources and class materials, what did you use to make the image?
b. Also, include historic recipes from the reading. How do the methods we use in class relate to those used in the 19th century? What are some of the variations used in recipes? What manuals in google books mention these process (19th century manuals are preferable).
IV. My experience
a. Discuss your experience using the process, note observations and comments, difficulties you had, things you would do differently, scan/photo your own results
b. What is your hypothesis?
c. Results - How did things turn out? What would you change?
V. Miscellaneous
a. Add a section of things you find interesting, this is up to you, feel free to be creative, bring in contemporary artist, etc
VI. Summary
Explain your finding briefly and try to explain your results. This should be a brief conclusion.
Wednesday, May 18, 2011
Van Dyke
Van Dyke information to be filled out here.
Van Dyke
I. Introduction
d. Give an overview of the process and its history
e. You should bring in information from primary sources and from the reading
f. Include images
II. Links to relevant web pages, articles and videos
a. Contemporary artists using this method, alternative photo
III. Describe the process, recipes and materials
a. You should reference internet sources and class materials, what did you use to make the image?
b. Also, include historic recipes from the reading. How do the methods we use in class relate to those used in the 19th century? What are some of the variations used in recipes? What manuals in google books mention these process (19th century manuals are preferable).
IV. My experience
a. Discuss your experience using the process, note observations and comments, difficulties you had, things you would do differently, scan/photo your own results
b. What is your hypothesis?
c. Results - How did things turn out? What would you change?
V. Miscellaneous
a. Add a section of things you find interesting, this is up to you, feel free to be creative, bring in contemporary artist, etc
VI. Summary
Explain your finding briefly and try to explain your results. This should be a brief conclusion.
Albumen
This is where information about the Albumen process would go. It's rather incomplete at the moment.
Albumen
I. Introduction
d. Give an overview of the process and its history
e. You should bring in information from primary sources and from the reading
f. Include images
II. Links to relevant web pages, articles and videos
a. Contemporary artists using this method, alternative photo
III. Describe the process, recipes and materials
a. You should reference internet sources and class materials, what did you use to make the image?
b. Also, include historic recipes from the reading. How do the methods we use in class relate to those used in the 19th century? What are some of the variations used in recipes? What manuals in google books mention these process (19th century manuals are preferable).
IV. My experience
a. Discuss your experience using the process, note observations and comments, difficulties you had, things you would do differently, scan/photo your own results
b. What is your hypothesis?
c. Results - How did things turn out? What would you change?
V. Miscellaneous
a. Add a section of things you find interesting, this is up to you, feel free to be creative, bring in contemporary artist, etc
VI. Summary
Explain your finding briefly and try to explain your results. This should be a brief conclusion.
Albumen
I. Introduction
d. Give an overview of the process and its history
e. You should bring in information from primary sources and from the reading
f. Include images
II. Links to relevant web pages, articles and videos
a. Contemporary artists using this method, alternative photo
III. Describe the process, recipes and materials
a. You should reference internet sources and class materials, what did you use to make the image?
b. Also, include historic recipes from the reading. How do the methods we use in class relate to those used in the 19th century? What are some of the variations used in recipes? What manuals in google books mention these process (19th century manuals are preferable).
IV. My experience
a. Discuss your experience using the process, note observations and comments, difficulties you had, things you would do differently, scan/photo your own results
b. What is your hypothesis?
c. Results - How did things turn out? What would you change?
V. Miscellaneous
a. Add a section of things you find interesting, this is up to you, feel free to be creative, bring in contemporary artist, etc
VI. Summary
Explain your finding briefly and try to explain your results. This should be a brief conclusion.
Sunday, April 10, 2011
Photogenic Drawing Part Two: Salted Paper
Also incomplete. Sorry.
Salted Paper and Photogenic Drawing V2
I. Introduction
a. Why is the image warm in color?
This has to do with the size of the crystals in the paper and the fact that different sizes gives off different tones. Because they are relatively small in size, that is the silver crystals, they give off a warm tone. Or maybe it's the other way around?
b. Why is the image different colors when fixed with salt or with hypo?
The salt and hypo remove some of the silver crystals, and so the image acts accordingly.
c. Explain the results of the colored cellophane.
The colored cellophane blocked out some UV lights and some let the light pass through. In some places, such as with the yello, the paper was white, but with the blue the paper was dark.
d. Give an overview of the process and its history
Basically you take your paper, did it in some salt, let it dry, brush on some silver nitrate let it dry, and expose it.
e. You should bring in information from primary sources and from the reading
f. Include images
II. Links to relevant web pages, articles and videos
A good place: http://www.alternativephotography.com/wp/processes/saltprints/a-dash-of-salt.
a. Contemporary artists using this method, alternative photo
III. Describe the process, recipes and materials
a. You should reference internet sources and class materials, what did you use to make the image?
b. Also, include historic recipes from the reading. How do the methods we use in class relate to those used in the 19th century? What are some of the variations used in recipes? What manuals in google books mention these process (19th century manuals are preferable).
IV. My experience
a. Discuss your experience using the process, note observations and comments, difficulties you had, things you would do differently, scan/photo your own results
I think I got pretty good results. I used different papers with the same solution to see how they would each react and they wrere fine pictures. Though I guess the correct term would be photograms. I don't think I would do anything differently.
b. What is your hypothesis?
About what? More silver, less salt will make it more reactant. The yellow, reds and green cellophane will block out most light, while the blues and purples will be the darkest.
c. Results - How did things turn out? What would you change?
Surprisingly, the color mixes (purple, orange, green) were the lightest, as was the yellow. The red and blue were the darkest parts though I believe the blue was darker. I wouldn't change anything.
V. Miscellaneous
a. Add a section of things you find interesting, this is up to you, feel free to be creative, bring in contemporary artist, etc
VI. Summary
Explain your finding briefly and try to explain your results. This should be a brief conclusion.
Camera Obscura
Howdy ya'll, this here is my (incomplete) entry on camera obscuras. It's kind of dull and incomplete at the moment but I've run out of time to get this complete. My apologies.
Camera Obscura
I. Introduction
a. Why does a lens restrict the size and configuration of the camera obscura box much more than a pinhole?
With a lens, you have a definite field of view, as opposed to a pinhole, which as a field of view close to infinity. With a lens, however, the field of view is dependent on the angle of the lens, how large it is, what material it's made out of, etc. So if you have a camera obscura made with a lense, you will need to have your film x amount of inches away from the lens, the x being the distance where the image is most clearest. Therefor, you cannot have a camera that is too long or too shallow, unless you adjust for the lens. With a pinhole camera, it can be as long or shallow as you want it to be, since you will almost always get an image regardless.
b. What type of lens do you have and how does it work?
The lens provided for my camera obscura were actually part of a relatively weak magnifying glass. I used the larger of the two. To use it you first need to find that distance where the image is most sharp. You can do this in a dark room that has a bright view of the outside or use your imagination. I just sat on my bed, with a box infront of me. With the lens facing the opened window I brought it closer to the box until I had an inverted image. I then moved the lens until it was a sharp as I thought it could be and measured that distance. I think it measure around five inches, though I'm not entirely certain at this time. I then took that distance and made sure the viewing screen was at least close enough to that distance. I made my lens movable to make finding that point easier.
c.Give an overview of the process and its history.
The word Camera Obscura is latin for "a darkened vault or roof, and hence it came to denote a chamber, or box, or any other place made dark for the purpose of optical experiments" or so Thomas Dick tells us in The Complete Works of Thomas Dick, which I found using Google Books. (This is the URL http://books.google.com/books?id=_UmFeuySlZgC&pg=PA788&dq=camera+obscura&hl=en&ei=OWW3TdvqDcbdgQfhnZF8&sa=X&oi=book_result&ct=result&resnum=6&ved=0CEQQ6AEwBQ#v=onepage&q=camera%20obscura&f=false. Have fun.) He tells us that the Camera Obscura is a dark room or chamber that has a small hole at one end which is open to the outside wall. Since light travels in a straight line they will pass through the hole perfectly, and display an image of the outside inside though it will be upside. This phenomenon describes perfectly what happens in our eyes, just so you know. The reason we don't see our world upside down as it appears with a camera obscura is that our brain rights the image.
And now for the history!
d. You should bring in information (quotes!) from primary sources and from the readings.
e. include images
none :(
II. LInks to relevant web pages, articles and videos
None at the moment. :(
a. Contemporary artists using this method, alternative photo, etc
There is a band called camera Obscura. Quite interesting. Haven't listened yet, but will in the near future.
III. Describe the process, recipes and materials
IV. Your experience
a. Discuss your experience using the process, note observations and comments, difficulties you had, things you would do differently, scan/photo your own results.
Making a camera obscura isn't all that hard to do. You take a box, make a hole at one end, and voila! Instant camera. If you're using a lens, however, you need to make the hole big enough for the lens and all.
I went kind of complicated on my in that I made my lens retractable. I also made a slot so that you could fit the film through the top, if you wanted to actually use film. Also, to ensure that the screen was most visible, I made viewing holes in the back. And then, since I couldn't stand the ugly color of it, I spray painted it copper.
. Results - How did things turn out? What would you change?
Things went rather well, I don't think I would change anything other than the fact that I wish I had written this blog earlier and that I had more time to actually finish it, my apologies professor.
V. Miscellaneous
Add a section of things you find interesting, this is up to you. Feel free to be creative, bring in contemporary artists, etc.
VI. Summary
Sunday, March 20, 2011
Photogenic Drawing
Introduction: Process and History, with pictures!
William Henry Fox Talbot, 1800-1877, was a gentleman scientist that was interested in optics, chemistry and art. He experimented with contact printing as early as 1834, however, did not publish his results until Arago's announcement of Daguerre's discovery.
As he followed in the footsteps of Thomas Wegwood (1771-1805) so did Sir John Herschel continue Talbot's experiments, exploring many material and processes, such as anthotypes (previously blogged).
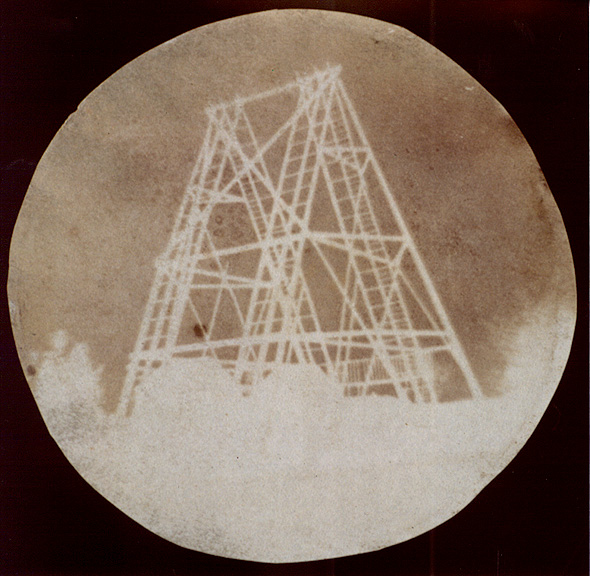
Talbot, frustrated with the limits of sketching with camera lucidas, he set off to discover a more permanent way of capturing images. After experimenting with a wide range of materials, he discovered photogenic drawing using silver nitrate and salt.
Photogenic drawings are "prepared by soaking a piece of good quality drawing paper in a weak solution of common salt, allowing this paper to dry, brushing it with a solution of silver nitrate, and then further washing it in a strong solution of common salt" ( (c) Museum of the History of Science, Broad Street, Oxford, England). You would then expose this image to sunlight until you got an image. You would then need to fix this image; Talbot used a strong solution of common salt. Herschel, on the other hand, discovered hypo fixer, a sodium thiosulphate solution, that dissolved away any remaining silver nitrate and stopped the reaction.
All this can be found at the Museum of the History of Science website here.
Links: Web pages, Articles and videos so you can learn more.
Oxford Museum of History of Science, http://www.mhs.ox.ac.uk/features/ephotos/pdtypes.htm.
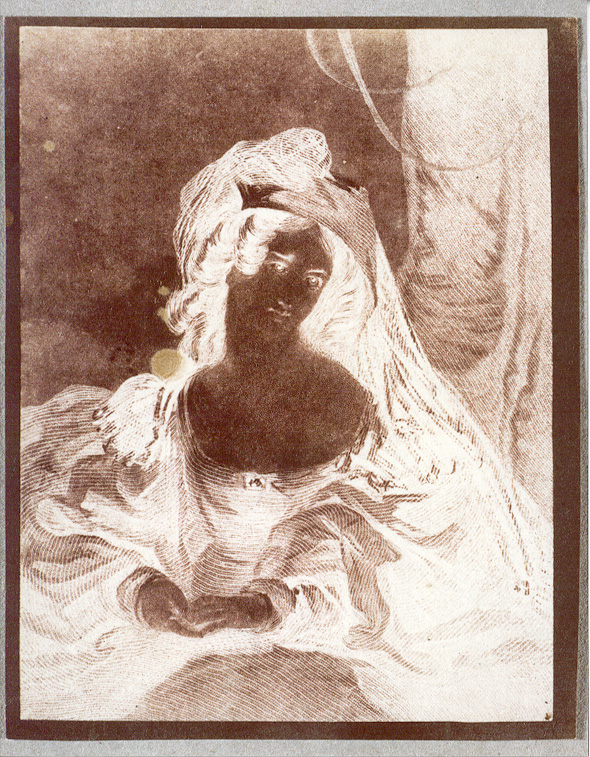
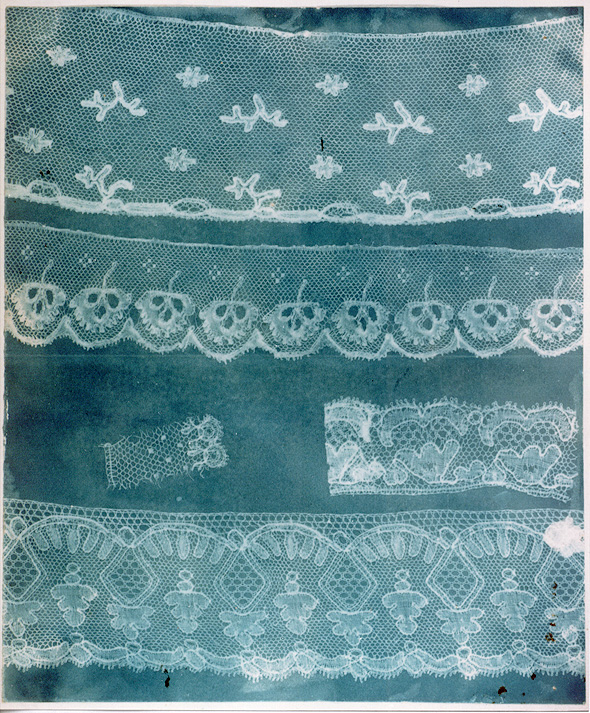
Here are some examples of photogenic drawing, from the Oxford website above.
 You can also view this website to learn some more, V&A Exploring Photography website.
This website give you a nice timeline of the history of photogenic drawing as well as tell you how to do it (which will be explained in the next section.)
Describe process, How to do it yourself.
Process as described here. (Same as site directly above.)
My experience, i.e. What I did
I followed the in class instructions (as described above) for my project. It was a bit difficult since there were many people using the same solutions at the same time. It was also confusing trying to remember which bit of paper had which percentage of salt and nitrate and if you had already applied that second coat. Other than this small inconveniences, the project went rather smoothly.
I am a bit disappointed that after the salt bath the image did not retain the same darkness it had when exposed to sunlight for a long time. Other than that, I am quite happy with how they came outand as soon as I can get my computer to respond, I will upload some of my own pictures. and here are the promised photos (in backward chronological order, sorry):


Misc, as in some other stuff I want to show you.
Hiroshi Sugimoto, check him out at this website. He's a contemporary artist who used photogenic drawing. He also took some of Talbot's originals, and exposed them, giving the world an even greater glimpse into the man and process.
Example of Sugimoto,

As soon as I can find more artist and things of that like, I shall post them up. Till then.
William Henry Fox Talbot, 1800-1877, was a gentleman scientist that was interested in optics, chemistry and art. He experimented with contact printing as early as 1834, however, did not publish his results until Arago's announcement of Daguerre's discovery.
As he followed in the footsteps of Thomas Wegwood (1771-1805) so did Sir John Herschel continue Talbot's experiments, exploring many material and processes, such as anthotypes (previously blogged).
Talbot, frustrated with the limits of sketching with camera lucidas, he set off to discover a more permanent way of capturing images. After experimenting with a wide range of materials, he discovered photogenic drawing using silver nitrate and salt.
Photogenic drawings are "prepared by soaking a piece of good quality drawing paper in a weak solution of common salt, allowing this paper to dry, brushing it with a solution of silver nitrate, and then further washing it in a strong solution of common salt" ( (c) Museum of the History of Science, Broad Street, Oxford, England). You would then expose this image to sunlight until you got an image. You would then need to fix this image; Talbot used a strong solution of common salt. Herschel, on the other hand, discovered hypo fixer, a sodium thiosulphate solution, that dissolved away any remaining silver nitrate and stopped the reaction.
All this can be found at the Museum of the History of Science website here.
Links: Web pages, Articles and videos so you can learn more.
Oxford Museum of History of Science, http://www.mhs.ox.ac.uk/features/ephotos/pdtypes.htm.
Here are some examples of photogenic drawing, from the Oxford website above.
This website give you a nice timeline of the history of photogenic drawing as well as tell you how to do it (which will be explained in the next section.)
Describe process, How to do it yourself.
Process as described here. (Same as site directly above.)
- Soak writing paper in a weak solution of sodium chloride (common salt).
- When dry, sensitise the paper by brushing one side with a strong silver nitrate solution. This causes silver chloride to be formed on the surface of the paper.
- Take the photo while the paper is still wet. An exposure of at least an hour may be needed. This will imprint an image on the paper.
- Remove the paper from the camera and wash it.
- Stabilize (or 'fix') the image on the paper by soaking the paper in a strong solution of sodium chloride. This produces a negative image on paper.
- Treat a second sheet of paper with salt + silver nitrate, as above.
- Lay the negative created above on top of the newly-coated sheet of paper + expose to light.
- Wait for a positive image to emerge then fix as above
What we did in class
- Create the solutions of salt and silver nitrate. Create a 2% and 5% salt solution and a 5% and 12% silver nitrate solution by mixing silver nitrate and salt with distilled water. You should use gloves, goggles and a lab coat to protect yourself, especially around the silver nitrate
. - Get your paper ready. I used bristol for mine, though other used tracing paper, rag paper, and water color paper. The type of paper you use will determine certain aspects of your finished paper. The solutions themselves may react with the chemicals and byproducts in the paper and the surface texture of the paper will determine how clear the image is
. - When you have your paper, you will want to take all four sides to a flat surface. Since we were experimenting to determine which solution and paper type would be best for this project, we divided the paper into four different sections. One would have one coat of 2% salt with two coats of 12% silver nitrate; another section had one coat of 2% salt and one coat of 5% silver nitrate; another one coat of 5% salt and two coats 5% silver; yet another had one coat of 5 % salt with two coats of 12% silver nitrate
. - Writing down what each section would have, you first apply the salt solution. We only applied this layer once
. - We then took a hairdryer and dried the salt
. - We them moved onto the silver nitrate. Using a dropper, we placed some solution on the paper and used a spongy brush to evenly distribute it
. - You dry it again, and if necessary, apply a second coat and let that dry as well
. - You then take objects or negatives, whatever, place them on top and expose it to the sun
. - You will see as the color of the paper changes from white to a very dark brown. Once you believe enough time has passed you bring it back inside and fix it
. - In keeping with Talbot's tradition, we used a bath of strong salt to fix it, though since it is not a permanent fix, the silver nitrate will still continue being photo sensitive, so you should keep away from light
. - You're done! Go show it off and make your friends jealous.
My experience, i.e. What I did
I followed the in class instructions (as described above) for my project. It was a bit difficult since there were many people using the same solutions at the same time. It was also confusing trying to remember which bit of paper had which percentage of salt and nitrate and if you had already applied that second coat. Other than this small inconveniences, the project went rather smoothly.
I am a bit disappointed that after the salt bath the image did not retain the same darkness it had when exposed to sunlight for a long time. Other than that, I am quite happy with how they came out

Above: That's my notebook that I use to take notes.
And that brown spot is where I got some silver on
it, probably through the gloves.
The moral is: be careful with this stuff, it
gets everywhere.
 | ||
Above: That's my thumb. I don't know how I got
silver on it since I was wearing gloves,
but you can see the dark part where it's reacting.
Again, be careful when handling these materials.

Above: The picture above is the photogenic drawing
my lab partner, Erica(sp?) made.
You can see where it got really dark when exposed to light.

Above: Those would be mine. I rather like how they came out,
though they were more purple before the salt bath.

Above: Pictures in the salt bath.

Above: A fellow lab partner's (sorry, I forgot your name) project.
You can see how dark they got, but they'd get lighter in
the salt bath. She used watercolor paper.

Above: The professor said not to use tracing paper since it's
kind of waxy, and the process wouldn't really work out
but this guy (Sorry, forgot your name too) decided
to go and use tracing paper anyway and it came
out rather nice.

Above: Erica's "drawing" before the salt bath.
She used 100% Rag Cotton Paper.

Above: My "drawing" before the salt bath. I used Bristol paper.

Above: Watercolor and tracing paper out in the sun.

Above: My pictures out in the sun.

Above: Erica's and my pictures out in the sun. You
can see the snow in the background and it
was actually snowing a little that day.

Above: My "drawing" before exposure to sunlight.

Above: Our (Erica and I) prepared papers before
exposure to sunlight. You can see that even in low
lighting, the paper still got dark in some places,
especially the 100% cotton rag, though
that may have been more about the strength of our solution.

Above: The 100% Cotton Rag paper reacting to light
before exposing it.

Above: The papers are drying and reacting even in the low light.

Above: We used a hairdryer to speed up the drying process in
between layers.

Above: Our paper, taped down, marked an ready to be
salted.

Above: Mixing the silver solution until all the Silver
Nitrate is gone.

Above: My paper of choice was Bristol.

Above: The beaker we used to measure the water.

Above: The silver nitrate and distilled water solution
being stirred. You can see the silver at
the bottom and the blur where
we stirred it.
Misc, as in some other stuff I want to show you.
Hiroshi Sugimoto, check him out at this website. He's a contemporary artist who used photogenic drawing. He also took some of Talbot's originals, and exposed them, giving the world an even greater glimpse into the man and process.
Example of Sugimoto,
Anthotypes
Introduction
Anthotypes come from the word anthos, meaning flower, and type, which I'm not entirely sure what that means. It may refer to flower pressing, since you use flowers; it may mean symbol or figure. What ever the origin of the name, it now primarily means using flowers to create an exposed image.
Anthotypes use the juices of vegetables and fruit as well as the color essence of flowers. You then take these liquids, apply them to a surface, place something on top to block some light and expose it to the sun. When you take the object off, after some time in the sun, you will notice a dark spot, the difference in the light and dark areas are what give you an image. They are rather nice to look at but you will have to do so in a dark area, as there is no way to fix the image, that is to stop the reaction of the paper to the sun.
The invention of anthotypes are credited to Sir John Herschel, who came up with the process in 1842.
Process and History, with pictures!


Web pages, Articles and videos so you can learn more.
To learn more about the process and history you can go to the alternativephotography website.
Here's another place you can go to, should you want to see how people make anthotypes today, Vedos Anthotype page.
And here's a neat video that you might find helpful. I found it over here, in case you want to explore it.
And if you're the type to spend your days on Facebook, they even have an alternative photgraphy group you can join.
How to do it yourself.
This is how the internet (aka alternative photography site) makes anthotypes:
What I did
I basically followed those instructions I wrote, except for the whole showing off thing, since I'm not quite done and the image isn't fully exposed yet.
For my solution I used 40ml of blackberry and blueberry (skins) juice with 10ml of water. Using a spongy brush, I applied nine layers to get this pretty purple almost pink color.
I placed it on my window on March 11th, 2011 at 3:36PM, and have left it there since. I have checked it once in a while, but it still isn't at the stage where you can distinguish different colors. It's still a work in process.

Misc. section.
Well, you should definitely check out those videos and sites I posted previously, and here's some more stuff you should look at if your interested in anthotypes.
These photos by Jalo Porkkala over at Vedos.


And if I can think of any more, I'll update them. Till then.
Anthotypes come from the word anthos, meaning flower, and type, which I'm not entirely sure what that means. It may refer to flower pressing, since you use flowers; it may mean symbol or figure. What ever the origin of the name, it now primarily means using flowers to create an exposed image.
Anthotypes use the juices of vegetables and fruit as well as the color essence of flowers. You then take these liquids, apply them to a surface, place something on top to block some light and expose it to the sun. When you take the object off, after some time in the sun, you will notice a dark spot, the difference in the light and dark areas are what give you an image. They are rather nice to look at but you will have to do so in a dark area, as there is no way to fix the image, that is to stop the reaction of the paper to the sun.
The invention of anthotypes are credited to Sir John Herschel, who came up with the process in 1842.
Process and History, with pictures!
According to Martin Helmut Reis over at alternativephotography.com, people have that plants and vegetables have photo-sensitive properties for centuries.Henri August Vogel in Paris was one of the first who actually did experiments about those properties. In 1816 he discovered that "An alcoholic tincture of either red carnations, violets or corn poppy turned white behind blue glass in a few days, while it remained unchanged behind red glass after about the same time. Cotton and paper coloured with these tinctures showed the same differences."
In an attempt to make color photographer, John Herschel tried flower and plant emulsions. Because he published his findings, many credit him for the invention. He discovered, however, that this process was very limited and would later abandon it since he could find no way to permanently fix the image and since it took days for the image to be produced, it could not be marketed on a commercial level. It was listed and basically forgotten.
Some images you may like.
Above: Sir John Herschel, photographed by Julia Margaret Cameron (1867)
Web pages, Articles and videos so you can learn more.
To learn more about the process and history you can go to the alternativephotography website.
Here's another place you can go to, should you want to see how people make anthotypes today, Vedos Anthotype page.
And here's a neat video that you might find helpful. I found it over here, in case you want to explore it.
And if you're the type to spend your days on Facebook, they even have an alternative photgraphy group you can join.
How to do it yourself.
This is how the internet (aka alternative photography site) makes anthotypes:
- Start with any flower you like although the following seem to work well: Poppies (images below were made with the red poppies above) or Peonies (Clive Heritage-Tilley). According to Henry S. Snelling the leaves of the laurel, common cabbage, and the grasses, are found sufficiently sensitive. I have also tried Goldenseal and Echinacea but results were not encouraging.
The most important thing to remember is that many, many species of flowers have never been explored. Crush the petals in a pestle and mortar to a fine pulp and add a little distilled water as you go. The purest water you can find is recommended since any impurities will interfere with the delicate light sensitive properties of the emulsion. Filter the juices through a cheese cloth or clean linen to remove small plant bits and some impurities.
- Using a clean simple brush coat any paper you like (hand-made Paper being an extra nice touch) in nice even strokes vertically and horizontally leaving no pools of emulsion on the surface.
- Dry the paper in the dark over-night or with a hand dryer on low heat.
- Contact print any media or plant in a printing frame or clip frame. Expose in full sunlight over 1-3 days or more depending on your aesthetic. Done. The print can be kept in subdued or artificial light although exposure to direct sunlight is discouraged.
A method of fixing Anthotypes is not known and perhaps not necessary despite obvious limitations.
- And you're done.
- Find a fruit you like and take its juice. Some people used tomato juice, spinach, strawberries, blackberries, blueberries. If it gives off some type of tint, you should be able to use it. Since our project was mainly one that would last all quarter, we avoided using flowers.
- Once you've got your fruit/vegetable of choice, get its juice. You can use a mortal, a food processor, your hands, whatever.
- Now you mix it with some distilled water or alcohol to make it lest solid. You don't have to do this if your solution is liquidy enough. You may also want to record how much of what you use for future reference.
- Once you've got that, you have to decide if you solution needs to be filtered. If there are pieces of what used to be fruit in there, chances are you don't want to skip on this step. We used coffee filters and a metal mesh, the kind with small holes. We wet the filter, and placed it into the mesh, filled it with the solution and let it drip. You can stir the solution but be careful, as the coffee filter might break.
- Once you've done that it's time to coat your paper. To do this first you want to select your paper, we used 100% rag, and tape it to a flat surface. It's best to take it completely on all four sides, so no solution gets underneath. I, in all my wisdom, only taped the corners and had purple stuff on the underside as well as on top.
- Now you take your brush, we used sponge brushes, and dip it into the solution. You may want to drain some out before applying the bush to the paper.
- When applying the solution to the paper, remember to apply only in one direction, and try to keep everything even, otherwise you'll end up with splotches and what now.
- If you decide to apply multiple coats, remember to apply in a perpendicular fashion to how you did the first time. It's also best if you let it dry a little.
- Now you take your hairdryer, on low heat so as to not cause a shortage, you dry the paper. When it's nice and dry, you put some shape or object on top that's thick enough to block out sunlight, and you tape it to a window or your car, whatever you wish, as long as it gets enough sunlight.
- You wait a couple of months or so and the sun will have worked it's magic and bleached enough of the color out that you get a distinction.
- Show it off, 'cause you're done.
- Repeat if desired.
What I did
I basically followed those instructions I wrote, except for the whole showing off thing, since I'm not quite done and the image isn't fully exposed yet.
For my solution I used 40ml of blackberry and blueberry (skins) juice with 10ml of water. Using a spongy brush, I applied nine layers to get this pretty purple almost pink color.
I placed it on my window on March 11th, 2011 at 3:36PM, and have left it there since. I have checked it once in a while, but it still isn't at the stage where you can distinguish different colors. It's still a work in process.
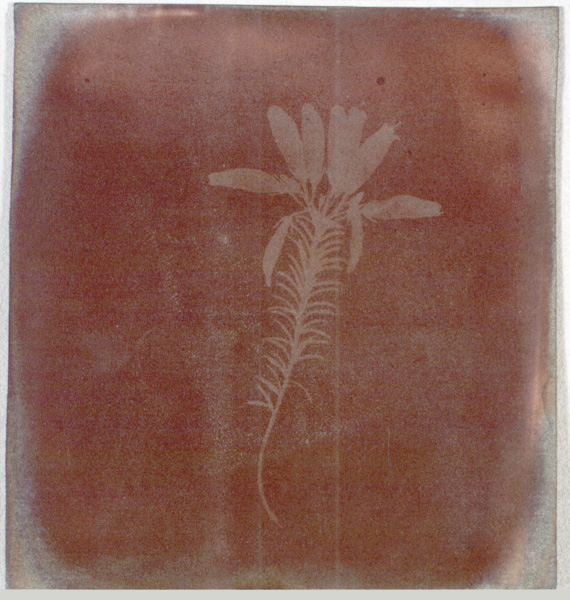
Below is a picture of my in-progress anthotype. It's still rather dark, even
though it's been exposed for two weeks already.
But the light in Rochester, NY isn't all that strong,
especially in the Winter/Spring transitional
time. It says Natasha and Christina because
I'm a sap. Natasha is my sister's name, just so you know.

Misc. section.
Well, you should definitely check out those videos and sites I posted previously, and here's some more stuff you should look at if your interested in anthotypes.
These photos by Jalo Porkkala over at Vedos.
And if I can think of any more, I'll update them. Till then.
Subscribe to:
Comments (Atom)